zaterdag 15 april 2017

The Complete COLOR GRADING Tutorial for Premiere Pro: CINEMATIC FILM LOOK
http://cinecom.xyz/PremiumBeat2017
- From basic color corrections to color theory and advanced color
grading. Learn how to get that cinematic film look in this complete
tutorial for Adobe Premiere Pro.
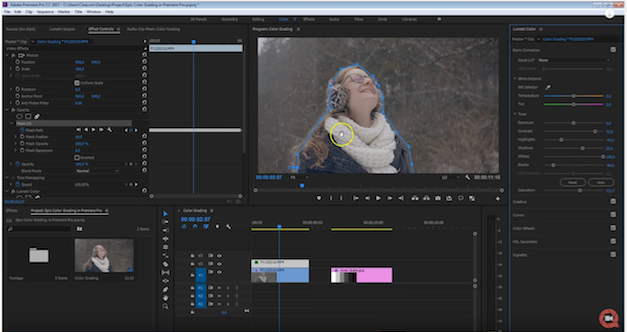
Color grading or color correction isn't an easy process to learn. Apart from the technical difficulties, there are many creative choices that have to fit a certain color theory. In this tutorial video we show you the complete process for achieving that cinematic film look you'll see in Hollywood blockbusters. In this tutorial video we'll be using Adobe Premiere Pro Lumetri.
This tutorial covers the grading process in 3 stages:
1. First we start by setting the correct exposure and contract. This process is considered as color correction. You can follow this link to learn the difference between color correction and color grading.
2. Next the color grading tasks come in place. We push specific colors in the shadows, mid-tones and highlights to achieve a look & feel.
3. Finally extra elements are added like flares or color shapes. We also mask specific areas in the shot, such as skin tones, to make them pop and draw attention to it.
To video
Color grading or color correction isn't an easy process to learn. Apart from the technical difficulties, there are many creative choices that have to fit a certain color theory. In this tutorial video we show you the complete process for achieving that cinematic film look you'll see in Hollywood blockbusters. In this tutorial video we'll be using Adobe Premiere Pro Lumetri.
This tutorial covers the grading process in 3 stages:
1. First we start by setting the correct exposure and contract. This process is considered as color correction. You can follow this link to learn the difference between color correction and color grading.
2. Next the color grading tasks come in place. We push specific colors in the shadows, mid-tones and highlights to achieve a look & feel.
3. Finally extra elements are added like flares or color shapes. We also mask specific areas in the shot, such as skin tones, to make them pop and draw attention to it.

To video
The FASTEST Way to Edit Video (Three-Point Editing) | Premiere Pro Tutorial
LEARN THREE-POINT EDITING AND EDIT LIKE A PRO! | Learn about what
three-point editing is and why it's so great! | We will go over exactly
how and why you would use these techniques in Premiere and just how easy
they are!

To video

To video
Render 300X FASTER | Premiere / After Effects / Media Encoder | Adobe | 2016
If you have an unoptimized Adobe program for video editing, like After
Effects, Premiere Pro and Media Encoder, rendering can take a long time.
With this FREE method, you can HALF or even QUARTER the time needed to
render a video or short clip.
Why waste time when you can rocket ahead and put more time into video editing and making higher quality content instead of putting all of that time into rendering
 To video
Why waste time when you can rocket ahead and put more time into video editing and making higher quality content instead of putting all of that time into rendering

donderdag 6 april 2017

5 ways to INSTANTLY make BETTER VIDEOS!
I'm showing you 5 ways you can instantly make better videos. None of this requires you having to buy extra equipment.
By utilizing these steps you will be able to improve the overall quality, look, sound and feel of the videos you make right away. I hope you guys dig it! Try some of it out!

To video
By utilizing these steps you will be able to improve the overall quality, look, sound and feel of the videos you make right away. I hope you guys dig it! Try some of it out!

To video
Cine Lenses vs Photo Lenses: Arri Ultra Primes [4K]
Are cinema lenses worth it? Can you shoot high-quality footage with
photography glass? What are the best lenses for video? In order to
answer those questions, I take a look at the Arri/Zeiss Ultra Primes and
put them up against some of the lenses that I personally own.

To video

To video
Xeen vs Rokinon Cine Lenses
More info & test here: https://goo.gl/fMNb5R
Exclusive tutorials: http://tomantosfilms.com/store/
FREE filmmaking tutorials here: http://bit.ly/Tmd65z

To video part 1
Exclusive tutorials: http://tomantosfilms.com/store/
FREE filmmaking tutorials here: http://bit.ly/Tmd65z

To video part 1
What's New in TitleMations 2 for FCP X
Titlemations is a set of professionally designed, animated title templates for Final Cut Pro X that can be used to enhance your video projects and capture your viewer’s attention.
With over 2 dozen templates to choose from, you can use Titlemations “out of the box” or you can change the look, style and animation properties with only a few mouse clicks.
Titlemations were designed for ultimate flexibility, allowing you to mix and match, combine, and build title animations that are sophisticated, elegant and engaging.
Titlemations from Ripple Training are sold, delivered, and managed through the FxFactory application, and appear in the Titles Browser in Final Cut Pro X once installed. A fully-functional watermarked version is available for free.
Creating clean professional-looking title animations should be easy. With Titlemations, now they are.
FxFactory Plugins for Final Cut Pro, Motion, Premiere Pro and After Effects:
https://fxfactory.com

To video
Final Cut Pro X - FULL TUTORIAL
Learn Final Cut Pro X in this Full Tutorial complete with FREE Resource Guide: http://bit.ly/FCPShortcuts

To video

To video
Abonneren op:
Posts (Atom)